 1. Create a backup of the Sybase ASE database
1. Create a backup of the Sybase ASE database
Select_Into.sql script to do this.Warning: The Sybase database and the MS SQL database must have the same name later on. Choose the name with care.
Convert46_<%DatabaseName%>.<%DatabaseName%> must match the name of the customer database exactly; for example, Convert46_IsahDB. In various scripts, this database name is appended to the Convert46_ string.
Create_ASE_Convert46DB.sql as a template.Select_Into_Convert.sql script. This script is run on the database that is to be converted.3. Run the latest update pack of version 4.0 to the ASE database
Run the latest Isah 4.0 patch to the database you want to migrate. You can download the latest Isah 4.0 version from the Isah Supportsite.
4. Set the version number for the migration
Run the Update_VersionNr.sql script to set the correct version number for the migration.
5. Apply the structure changes to ASE
Run the 4_6_00_63 patch. Run RunDBUpgrade.cmd from the ASE_Database_Patches\90_DBPatch_4_6 subfolder. All standard Isah 4.0 objects (except for tables and views) are now deleted.
When the database is successfully upgraded to 4.6.0_063, press the Run engineering check button. If there are issues regarding the migration of engineering data, the tool creates reports in the C:\Users\Public\Documents\Isah\Engineering migration 4.6 folder. Please refer to the 'Aandachtspunten voor migratie Engineering' (Migration Issues Engineering) document for more information.
6. Restore the MS SQL Server customer database
In MS SQL Server, create a backup of the database used for the test migration and restore it into the new production database.
Warning: The Sybase database and the MS SQL database must have the same name later on. Please make sure you use the same name you used for the Sybase database.
7. Restore the MS SQL Convert46DB
Convert46_<%DatabaseName%>.<%DatabaseName%> must match the name of the customer database exactly; for example, Convert46_IsahDB. In various scripts, this database name is appended to the Convert46_ string.
8. Save the setup of the test migration
Run the Save_TestConfig.sql script to save the setup made during the test migration.
9. Delete the Identity columns
Run the T_ProjectLineCostBudgetLog_Before.sql script shown on the MS SQL database.
10. Delete the Identity columns of the custom tables
SaveIdentityTables.sql and RemoveIdentityColumns.sql scripts. These scripts are saved automatically.RemoveIdentityColumns.sql script on the MS SQL Server database. The SaveIdentityTables.sql script will be used later.12. Restrict RAM allocation for MS SQL and Sybase
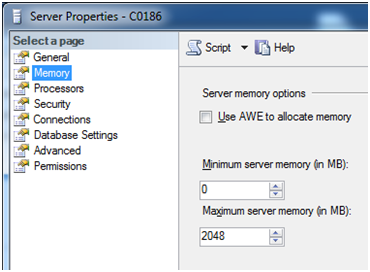
If insufficient memory is available for the SSMA tool because the ASE server or the MS SQL server has allocated all RAM, the data migration process will be very slow. For instance, on an 8GB server you need to assign a maximum of 3 GB to ASE and a maximum of 2 GB to MS SQL Server. The OS also uses 1 GB, leaving 2 GB for the SSMA tool. On a 64-bit system, Sybase can allocate up to 4 GB. If MS SQL Server is not restricted, the server will use all available RAM.
MS SQL Server
Sybase
<ServerName>.cfg file.max memory. It shows the number of 2 KB reserved pages (2,000,000 pages of 2 KB is 4 GB). If you lower this number, you may also have to restrict the default data cache.