Sometimes it is more practical to display only a selection of data. Use the filter form to specify the conditions for the data selection on the List tab, to display only customers from New York or Chicago, for instance. The formatting definitions determining which cells or rows will be highlighted are saved on a per-preset and per-user basis.
You can define filters and save them for later use.
To use a filter in a list, you can:
Select an existing filter. Click next to the filter icon . Activate the filter of your choice.
Create a filter for one-time use. To display a particular selection just once, click and select the filter 'Default', which is always available. In the Conditions section, define the conditions the selection must satisfy. The filter will remain active as long as the form is open. The filter is not saved for future use.
Create a filter for repeated use. To be able to reuse a filter, click and then click to create a new filter. Specify a name for the filter. In the Conditions section, define the conditions the data selection must satisfy. You can create multiple filters. You can reorder the filters by using the and icons.
Available actions
The following actions are available for filters:
To create a filter, use . You need to specify the conditions.
To change a filter, use . This enables you to change the filter name. If you try to rename the 'Default' filter, the conditions will be copied to a new filter with the name you specify. It is not possible to rename the 'Default' filter.
To copy a filter, use . This will copy the conditions to a new filter. You need to specify a name for the new filter.
To delete a filter, use .
To save a filter as a formatting definition (conditional formatting), click . The lines that meet the specified conditions will not be the only lined displayed, but will be the only lines highlighted on the List tab.
Copy filters to another user. To let another employee use the filter, use the Copy user settings process.
Tip: Open the View menu and select Show filter box to display the active filter on the status bar:
Example
Defining conditions
To define the conditions for the data selection, do the following:
Click Filter and choose Add condition.
Then choose the field you want the condition to apply to, and specify the condition, for example 'Town/city equals New York'.
To add another condition, click Click here to add a condition.
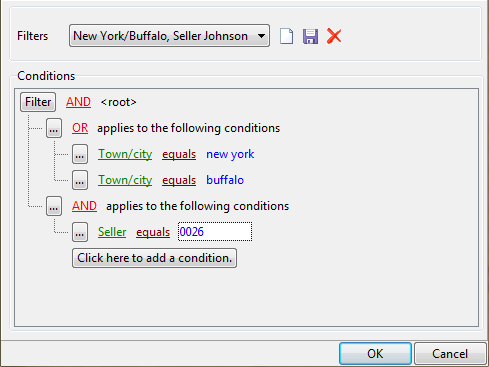
Choose 'AND' if the data must meet all conditions. Choose 'OR' if the data should meet at least one condition, for example if you are looking for customers from New York or Chicago: 'Town/city equals New York' OR 'Town/city equals Chicago'.
To combine mandatory and optional conditions, click Filter and then choose Add group. For example, to search for customers in New York or Chicago who have a sales employee called Johnson, type the following: 'Town/city equals New York' OR 'Town/city equals Chicago' AND 'Sales employee equals 0026' (where '0026' is the employee code of sales employee Johnson).